Loading from/to a Load Table
Introduction
Load tables are used when working with interfaces based on events in Priority itself, such as a procedure that opens a customer shipment based on a sales order. While mostly used to import data into new or existing records, you can also export data from existing records to a load table, manipulate it, and then reimport it as new records. This is the case for copying an existing document.
A load table is a special table with a specific structure. The default GENERALLOAD table will suffice for most use cases, but you can also create your own. You can also add additional columns to the GENERALLOAD table if necessary.
To use a load table for your interface, specify it in the Form Load (EDI) form, in the Load Table column.
Before you start mapping out the interface, it is a good idea to manually perform the operations to be automated in the actual form. Take note of the order in which you filled in the fields, as well as any mandatory fields. By doing this ahead of time, you can find any errors that might cause the interface to fail.
Mapping the Interface
In the Forms for Import sublevel, record the form(s) with which to interface, and the Code(Record Type) associated with each. The interface recognizes the form by its record type.
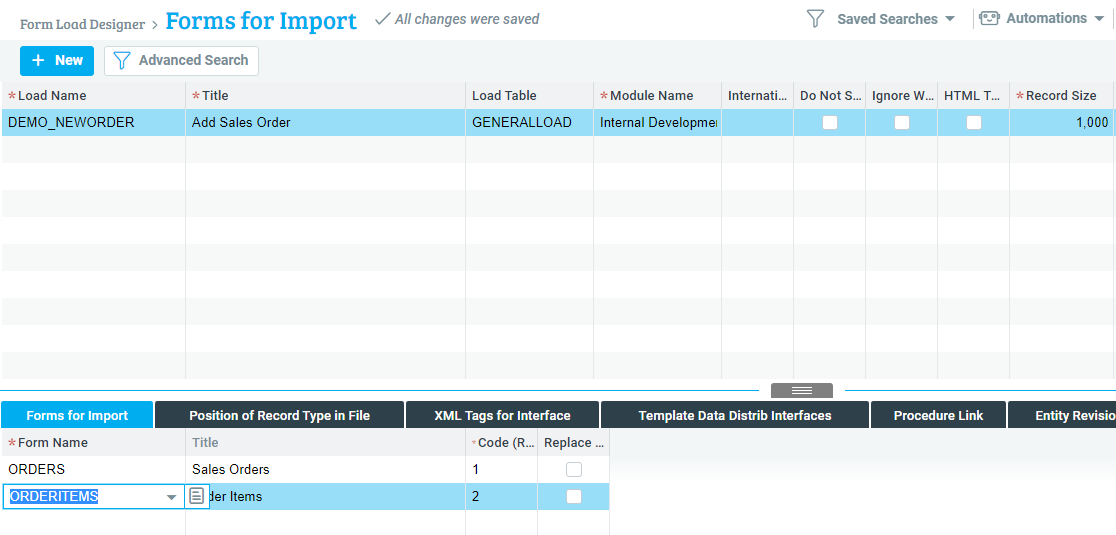
Indicate the name of each form, as well as the code representing its record type. Each level in the form tree must be assigned its own unique record type (e.g., ORDERS = 1; ORDERITEMS = 2).
Tip: After recording a form, use the List of Sub-level Forms report from the list of Actions to view all its sub-levels (one level down only).
For each form, if you want the interface to overwrite existing records in the sub-levels, flag the Replace Form Data column. Leave it blank to add the new records to existing ones.
Notes:
- This flag is used primarily for text forms.
- Use of this flag to overwrite form data is based on the assumption that the existing record(s) will be deleted successfully.
- If the form in question has a PRE-DELETE trigger, it is not advisable to flag this column, as the trigger may interfere with deletion.
Link Form Columns to Table Columns
Use the next sub-level, Link Form Cols to Intrm Tbl Cols, to indicate which form columns are equivalent to which load table columns and to specify the order of column insertion.

While the Choose list of form columns only includes updatable columns in the form, the INTERFACE program can also insert values into hidden columns. This is useful, for instance, when you want to create a form load that updates records. Do so with caution, however. In most other cases, it is not good practice to insert values into hidden or read-only columns, as this may contradict some checks defined in the form.
Example: To update the unit price of ordered parts whose records already exist in the ORDERITEMS form, you would define one of the load table columns as updating the hidden ORDI column in that form. In this case, make this column first in order of insertion. But to specify the ordered part, use the PARTNAME column. Do not use the hidden PART column, even though this may seem easier, as the CHECK-FIELD trigger of the PARTNAME column will be bypassed and this is likely to have an adverse effect on record insertion.
If you want the INTERFACE program to treat empty strings and zero values as a true value, flag the Insert Null Values column.
Example: Flag this column to load records into the ORDERITEMS form for ordered parts with a unit price of 0. Otherwise, the INTERFACE program will ignore the 0 value in that column and insert the default unit price of the item instead by activating the form's trigger.
Default Values
Use the Default Value for Column subform to assign a default value to be loaded into the form column. If the load table column is empty, the value specified here will be loaded into the form table. Likewise, when the form interface is used to export data, if the form column is empty, the default value will be exported.
Implementation in Code
Now that we have mapped out the interface in the form, lets take a look at how we might use it in our code.
/* There's almost never a reason to store data for an interface
permanently in a table, so we create a linked, empty copy of
the GENERALLOAD table */
SELECT SQL.TMPFILE INTO :DEMO_GEN FROM DUMMY;
LINK GENERALLOAD TO :DEMO_GEN;
GENMSG 1 WHERE :RETVAL <= 0; /* Generic system error message */
In this example, we have a simple interface for opening a new sales order with the following structure:
| Form | Form Title | Record Type |
|---|---|---|
| ORDERS | Sales Orders | 1 |
| ORDERITEMS | Order Items | 2 |
To open a new record in Sales Orders, we need only provide the customer code (CUSTNAME column). We have mapped it to the TEXT2 column of GENERALLOAD. Other fields in the form are filled in automatically.
INSERT INTO GENERALLOAD(LINE, RECORDTYPE, TEXT2)
SELECT 1, '1', CUSTOMERS.CUSTNAME
FROM CUSTOMERS
WHERE CUSTDES = 'Demo Customer';
In contrast, Order Items has 4 mandatory fields, as seen in the image above.
INSERT INTO GENERALLOAD(LINE, RECORDTYPE, TEXT2,
INT1, REAL1, DATE1)
SELECT SQL.LINE + 1, '2', PART.PARTNAME,
INTQUANT(1.0), PART.LASTPRICE, SQL.DATE + (24:00 * 10)
FROM PART
WHERE PARTNAME LIKE 'DEMO%';

/* The TQUANT quantity field is a shifted integer, so we
use INTQUANT with a real number to convert the quantity
based on the system's decimal precision settings */
The above code will insert into our interface all the parts that have a name that starts with DEMO.
Tip: Note the use of SQL.LINE to calculate our line number. Since the line number has to be unique, you can use SQL.LINE to auto-increment values in case you are inserting more than one line.
For the sake of example, our GENERALLOAD table would now contain the following values:
| LINE | RECORDTYPE | TEXT2 | INT1 | REAL1 | DATE1 | |
|---|---|---|---|---|---|---|
| 1 | ‘1’ | ‘DEMOCUST’ | ||||
| 2 | ‘2’ | ‘DEMO01’ | 1000 | 25.00 | 03/15/23 | |
| 3 | ‘2’ | ‘DEMO02’ | 1000 | 35.00 | 03/15/23 |
We are now ready to execute the interface:
EXECUTE INTERFACE 'DEMO_NEWORDER',
SQL.TMPFILE, '-L', :DEMO_GEN;
See Executing the Form Interface for more details on the various options when running the interface program. This one is fairly barebones, providing the name of the interface, a temporary file to store messages from the program, and the parameter that tells the program to use the linked table.
Assuming there were no errors, we should now have a new order in the system. The LOADED AND KEY columns in the GENERALLOAD table are updated based on the results:
| LINE | RECORDTYPE | LOADED | KEY1 |
|---|---|---|---|
| 1 | ‘1’ | Y | ‘120’ |
| 2 | ‘2’ | Y | ‘701’ |
| 3 | ‘2’ | Y | ‘702’ |
LOADED is set to Y for all lines that were successfully loaded. The KEY1 (and KEY2/KEY3/etc.) are filled in with the highest priority (autounique or unique) key of the line in the base table of the relevant form.
To support non-numeric keys, keys are always stored as strings. You can convert them to integers using the ATOI function, e.g.:
SELECT ORDERS.ORDNAME FROM ORDERS, GENERALLOAD
WHERE ORDERS.ORD = ATOI(GENERALLOAD.KEY1)
AND GENERALLOAD.RECORDTYPE = '1'
AND GENERALLOAD.LOADED = 'Y';
To end the example, we unlink the temporary table:
UNLINK GENERALLOAD;
Adding Line Items to an Existing Document
When an interface that adds line items to a document is executed, by default the new items are inserted first in the document (that is, they receive a smaller line number than existing records). For instance, if a given interface adds lines to an existing order that contains two lines, the new record will appear on line 1, the first existing order item will move to line 2 and the second existing order item will move to line 3.
If you want to change the position of the new record (e.g., move it directly after the first line item), do the following:
- Define the interface so that existing lines are retrieved (e.g., by linking the INT1 column in the load table to the KLINE or ORDI column).
- Add a column to the load table to hold the internal ID of the first line (KLINE or ORDI).
- In the load table, insert the record of the new line to be added after the record that retrieves the first line.
Creating your own Load Table
If the standard load table is not sufficient for your needs, you can create your own.
A load table must contain certain columns, defined as follows (name, type, width, title):
- LINE (INT,8,'Ln')
- RECORDTYPE (CHAR,3,'Record Type')
- LOADED (CHAR,1,'Loaded?')
- KEY1 (CHAR,20,'Key 1')
- KEY2 (CHAR,20,'Key 2')
- KEY3 (CHAR,20,'Key 3')
The LINE column must be the unique key of the table.
Note: For an example of a custom load table, see the predefined GENERALLOAD_T that meets these criteria. Moreover, it contains an extra TITLE column, which can be used to store a message that will be added to the form's error message (if there is one). See, e.g., the DELWTASKITEMS procedure.
In some cases (see below) you may need more than three key columns. As you define the forms included in the load, the Form Load Designer will warn you if there are not enough keys in the designated table. If you need more keys, add them to the relevant GENERALLOAD table or design your own table.