A new version of the ODBC driver was released on Dec. 22, 2025. You should reinstall the driver and update the BIN version if you are working with an older version.
Introduction
22.1
The Priority ODBC driver allows 3rd party applications to access data on the Priority server using SQL statements.
The driver does not provide direct access to the underlying database (MSSQL or Oracle), but rather to a wrapper which presents the same data available in Priority forms via the UI. Each form is represented as a table, and form fields are columns in this table.
Requirements
- The Priority ODBC Driver requires that you have a Priority Application Server installed.
- To use ODBC, you must obtain a license for the ODBC module.
- Ther user accessing ODBC must be assigned an API User license
Authentication
You can authenticate with the server in one of two ways:
- With a Priority username and password.
- Using personal access tokens. PATs can be defined in the REST Interface Access Tokens form in Priority.
If you access Priority using single sign on (SSO), use PATs for authenticating with ODBC.
Database Schema
Each Priority company is treated a seperate database, with the database name taken from the internal company name (DNAME). If you want to view data from more than one company, you need to establish multiple connections.
The tables of top level forms share the same internal name. For example, the ORDERS form is reprsented in the ODBC as the ORDERS table. The relationship between upper-level and subforms can be complex, with certain subforms having more than one possible upper-level parent. To circumvent this, when accessing a subform, the upper-level form must be stated explicitly, in the structure upperLevelForm_sep_subform, e.g. ORDERS_sep_ORDERITEMS.
Attempting to access just the subform (e.g., just ORDERITEMS) will generate an error.
The data available via ODBC is subject to the system privileges of the user making the connection. Forms which you are not authorized to view in the Priority UI are also unavailable via ODBC.
The number of returned records is capped based on the value of the MAXFORMLINES system constant in Priority (default value is 10,000). As increasing this value can negatively impact performance, when dealing with larger result sets we strongly recommend you implement pagination.
Setting Up ODBC
Update the BIN95 Folder
This step is for local machines only. Cloud customers can skip to Defining Forms as Available via ODBC.
The Priority ODBC Driver is available starting with version 22.1.21 (Nov. 6 2022) version of the Priority BIN95 folder. Download and update it as necessary.
For more information, see here.
Reinstall the Application Server
This step is for local machines only. Cloud customers can skip to Defining Forms as Available via ODBC.
On the Priority application server, run the Install Application Server procedure. A new option in the installation is to Activate ODBC on the application server.
Defining Forms as Available via ODBC
The Priority system has a large number of forms (over 3,000), but you generally only want to access a handful of them via ODBC. Therefore, only forms which are specified in the Define ODBC Forms form are actually exposed via ODBC.
To define forms as available in ODBC:
- Open the Define ODBC Forms form (System Management > System Maintenance > Internet Definitions > Define ODBC Forms).
- Select any forms you want exposed through ODBC in the Form field. If it is a subform, also specify the Upper-level Form. Add another line for each seperate upper-level form under which you want to access the subform.
The changes made in this form will take effect when you next connect with the ODBC Driver.
In order to improve performance, the ODBC driver caches to memory all metadata once it is received from the server. If there were server side changes to the metadata (columns added/removed/changed to a form, or added/removed forms), priodbc.dll should be reloaded (by restarting the client application).
Installing the ODBC Driver
This step should be performed on the machine from which you plan to connect to the system via ODBC.
- Download the Priority ODBC Driver Package.
- Extract the contents of the zip file to a folder of your choice. For example, if you extracted it in the root C:\ drive, you’d have a new folder C:\priodbc.
- Run the installation script install.bat as an administrator.
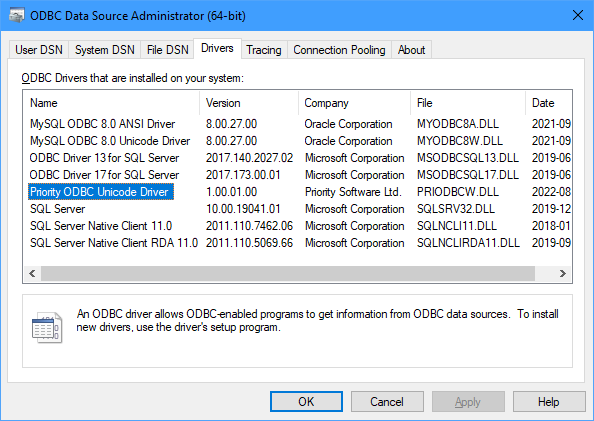
Verifying the Installation
You can check whether the installation was successful by running ODBC Data Sources (64-bit) (%windir%\system32\odbcad32.exe) and checking under the Drivers tab.
Note: Not to be confused with the 32-bit version (%windir%\syswow64\odbcad32.exe). The driver is only available in 64-bit.
Alternatively, you can check whether the driver is installed in the registry.
Connecting to the Data Source
Important: You can only connect to ODBC using a 64bit ODBC client. If you are running into issues, check whether your program is 32bit.
You can either pre-configure the data source, in the ODBC Data Sources (64-bit) utility, or add the configuration as part of the connection string in your code.
To preconfigure your data source:
- In the ODBC Data Sources (64-bit) (%windir%\system32\odbcad32.exe) utility, switch to the User DSN tab.
- Click Add.
- Choose Priority ODBC Unicode Driver and click Finish.
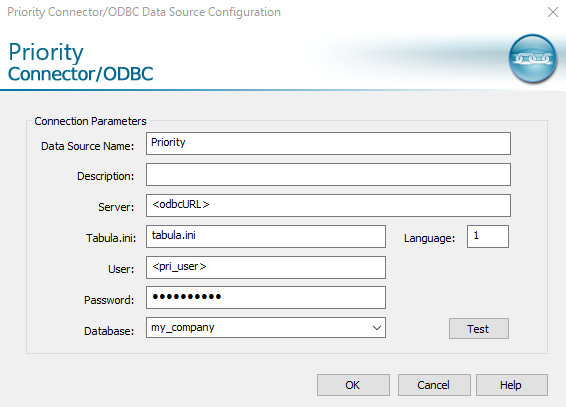
- Configure the connection properties:
- Data Source Name: Priority (or another name of your choice)
- Server: odbc_url (address of the ODBC service on the application server).
- Tabula.ini: tabula.ini (name of configuration file in Priority server)
- Language: 1 for Hebrew, 3 for English
Note: Language codes for other languages can be found in System Management > Dictionaries > Translation > Languages. - User: priority_username
If you are using Personal Access Tokens, this should be the token. - Password: priority_password
If you are using Personal Access Tokens, this should always be ‘PAT’. - Database: internal_company_name
Note: You can find the internal company name in Priority under System Management > System Maintenance > Companies > Companies.
- Press the Test button to check the connection.
To generate the ODBC url, use the Send Program Activation Link in Priority, send an API link, then replace the the entire part of the url that starts with odata and replace it with ODBC.
For example:
www.example.com/prirotiy/odata/Priority/tabula.ini/comp
Would become:
www.example.com/prirotiy/odbc
You can also test the ODBC against Priority’s sandbox environment, at the url https://www.eshbelsaas.com/ui/mob/odbc/.
Use the following information:
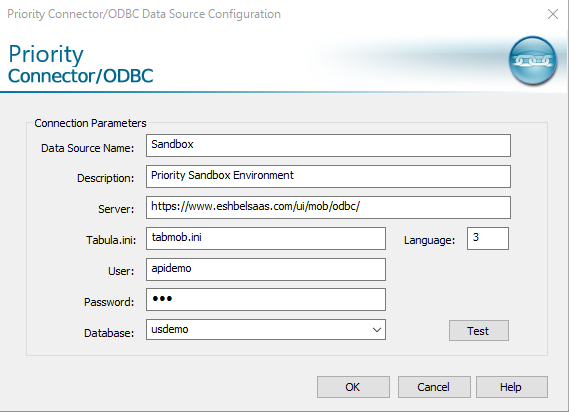
Password: 123
If you do not have a dedicated ODBC client, you can use Microsoft Excel to consume data from an ODBC source.
Connecting with a Connection String
Alternatively, you can fill in this data as part of the connection string:
Driver=Priority ODBC Unicode Driver;Server=<odbc_url>;Tabulaini=tabula.ini;Database=<my_company>;Lang=3;User=<pri_user>;Pwd=<pri_password>
ODBC Functions
Using the Priority ODBC Driver 3rd party application can retrieve list of databases, tables, primary keys, foreign keys, etc. Currently, the ODBC only supports the direct execution method. Prepared execution (SQLPrepareW and SQLExecute), procedures and catalog functions are not yet supported.
For more information on these functions, refer to one of many online ODBC API references, such as Microsoft.
The following is a list of functions supported in v1 of the ODBC driver:
SQLAllocConnect
SQLAllocEnv
SQLAllocStmt
SQLAllocHandle
SQLBindCol
SQLBindParameter
SQLBrowseConnectW
SQLCancel
SQLCancelHandle
SQLCloseCursor
SQLColAttributeW
SQLColAttributesW
SQLColumnPrivilegesW
SQLColumnsW
SQLConnectW
SQLCopyDesc
SQLDescribeColW
SQLDescribeParam
SQLDisconnect
SQLDriverConnectW
SQLEndTran
SQLErrorW
SQLExecDirectW
SQLExtendedFetch
SQLFetch
SQLFetchScroll
SQLFreeConnect
SQLFreeEnv
SQLFreeStmt
SQLFreeHandle
SQLForeignKeysW
SQLGetConnectAttrW
SQLGetConnectOptionW
SQLGetCursorNameW
SQLGetDescFieldW
SQLGetDescRecW
SQLGetDiagFieldW
SQLGetDiagRecW
SQLGetData
SQLGetEnvAttr
SQLGetFunctions
SQLGetInfoW
SQLGetStmtAttrW
SQLGetStmtOption
SQLGetTypeInfoW
SQLMoreResults
SQLNativeSqlW
SQLNumParams
SQLNumResultCols
SQLParamData
SQLParamOptions
SQLPrimaryKeysW
SQLRowCount
SQLSetCursorNameW
SQLSetDescFieldW
SQLSetDescRecW
SQLSetEnvAttr
SQLSetConnectAttrW
SQLSetConnectOptionW
SQLSetParam
SQLSetPos
SQLSetScrollOptions
SQLSetStmtAttrW
SQLSetStmtOption
SQLSpecialColumnsW
SQLStatisticsW
SQLTablesW
SQLTablePrivilegesW
SQLTransact
Debugging
There are a number of tools you can use to debug ODBC calls to the server:
Client Side
Enable tracing of interaction between ODBC client application (like ODBCQueryTool or Excel) and Priority ODBC driver in ‘ODBC Data Sources (64-bit)’ utility in client side:
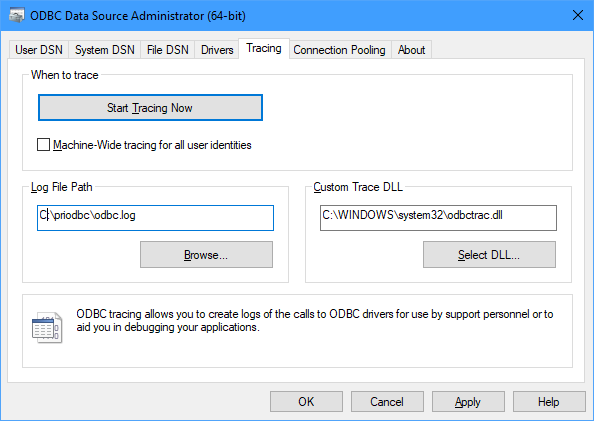
- Go to Tracing tab and set the path for the log file, for example ‘C:\priodbc\log\odbc.log’.
- Click the button Start Tracing Now to start tracing.
- Reproduce the problematic scenario to generate logs.
- Click on the button Stop Tracing Now to stop tracing.
Note: This tracing option will write to the log for any ODBC activity on the client computer (not limited just to the Priority ODBC driver), so you should stop tracing as soon as you’re done, as the log file has a tendency to grow in size extremely fast.
Driver Side
Note: Driver tracing is available starting with version 1.01.00 of the driver.
To enable tracing of ODBC requests in the ODBC driver do the following:
- Create a config file named tabula.ini and place it in the driver folder (default name priodbc). The file should contain the following:
[Log]
Server Level=5
Server Path=C:\priodbc\log
Server Buffered=0
Server By Name=1
The default log level is 5 (ERROR); it can be changed to 1 (DEBUG) to get more verbose information.
- Restart the client application (like ODBCQueryTool or Excel) after making the change for the new log level to apply.
- Reproduce the problematic scenario to generate logs.
- Logs will be written to file process_name.log in directory configured in Server Path, e.g. C:\priodbc\log\ODBCQueryTool.exe.log.
In case of any errors, the ODBC client application will show a short error message, such as:
[HY000][2000][Priority ODBC 1.1(w) Driver][connection error (502) (for details check logs in C:\priodbc\log)
The full details of the error can be seen in the log file itself:
14-03-2024 17:44:44,396[ERROR][ST584][4848]: connection error (502): got response from https://st584.ceshbel.co.il/odbc/ExecDirect with error: 'ChilkatLog:
  PostJson2:
    DllDate: Jul 25 2023
    ChilkatVersion: 9.5.0.95
    UnlockPrefix: PRTYSF
    UnlockStatus: 2
    Architecture: Little Endian; 64-bit
    Language: Visual C++ 2022 / x64
    VerboseLogging: 0
    url: https://st584.ceshbel.co.il/odbc/ExecDirect
    contentType: application/json
    jsonUtf8Size: 150
    fullRequest:
      a_synchronousRequest:
        generateRequestHeader:
          sbHost0: st584.ceshbel.co.il
          httpRequestGenStartLine:
            genStartLine:
              startLine: POST /odbc/ExecDirect HTTP/1.1
            --genStartLine
          --httpRequestGenStartLine
        --generateRequestHeader
        fullHttpRequest:
          domain: st584.ceshbel.co.il
          port: 443
          ssl: True
          openHttpConnection:
            Opening connection directly to HTTP server.
            httpHostname: st584.ceshbel.co.il
            httpPort: 443
            tls: True
            HTTPS secure channel established.
          --openHttpConnection
          connectTime: Elapsed time: 31 millisec
          sendRequestHeader:
            sendHeaderElapsedMs: 0
          --sendRequestHeader
          sendRequestBody:
            sendBodyElapsedMs: 0
          --sendRequestBody
          statusCode: 502
          statusText: Bad Gateway
        --fullHttpRequest
        success: 1
      --a_synchronousRequest
      success: True
    --fullRequest
    Success.
  --PostJson2
  urlObject_loadUrl:
  --urlObject_loadUrl
--ChilkatLog
Server Side
ODBC requests are tracked in nrest.exe.log in the Priority logs folder (for an on-premise server) or in Datadog (Priority Cloud servers).
Rules and Constraints
-
only SELECT statements are supported (no INSERT/UPDATE etc.)
-
only one SELECT statement per request is supported
-
SELECT statements must specify the selected columns.
SELECT * FROM -TABLENAME-is not supported. -
‘database.table’ notation is not supported, only table names should be used in SELECT statements
-
The following special characters can not be used in the names of objects (database, table, columns, etc.): @, #, $
- Subquery (select from select) is not supported :
SELECT OTBL.ACTNAME, OTBL.ACT, OTBL.WORKC, OTBL.C1, OTBL.C2, ITBL.WORKPATNAME, ITBL.WORKPATDES FROM ( SELECT OTBL.ACTNAME, OTBL.ACT, OTBL.WORKC, ITBL.WORKCNAME as C1, ITBL.WORKCDES as C2, ITBL.WORKPAT FROM ACT as OTBL left outer join WORKC as ITBL on (OTBL.WORKC = ITBL.WORKC) ) as OTBL; -
IS NULL / IS NOT NULL expressions must be replaced by
= ''or<> ''<> ‘’ for string values, and= 0or<> 0for numeric values, as there are no NULL values in the schema exposed by ODBC. -
The COUNT(X) function is replaced by COUNT(DISTINCT X)
- You can not use an expression in ORDER BY:
SELECT COUNT(ACTNAME) as c0, ACT.WORKC as c1 FROM ACT GROUP BY c1 ORDER BY COUNT(ACTNAME) DESC; But there is workaround: expression should be replaced by alias or index: SELECT COUNT(ACTNAME) as c0, ACT.WORKC as c1 FROM ACT GROUP BY c1 ORDER BY c0 DESC; SELECT COUNT(ACTNAME) as c0, ACT.WORKC as c1 FROM ACT GROUP BY c1 ORDER BY 1 DESC; - ORDER BY/GROUP BY column must appear in SELECTed columns:
SELECT ACTNAME FROM ACT ORDER BY ACT;The above statement will not work since ACT column is absent from the SELECT columns; it should be:
SELECT ACT, ACTNAME FROM ACT ORDER BY ACT; - You can not select by TOP PERCENT:
SELECT TOP 50 PERCENT VARNAME AS c0, ACT AS c1, PARAM AS c2, VAR AS c3 FROM ACT_sep_ACTVAR; - COUNT(X) doesn’t work for calculated fields:
SELECT COUNT(CINVOICES_sep_CINVOICEITEMS.DISPRICE) AS c2 FROM CINVOICES_sep_CINVOICEITEMS; -
Text forms are not supported
-
Picture fields are not supported
- Privileges for individual fields in a form, or for records by data authorization, are not yet supported.